| title | keywords | description | ||||
|---|---|---|---|---|---|---|
skywalking |
|
This document will introduce how the API gateway Apache APISIX reports metrics to Apache SkyWalking (an open-source APM) with the skywalking plugin. |
The skywalking Plugin is used to integrate with Apache SkyWalking.
SkyWalking uses its native Nginx Lua tracer to provide tracing, topology analysis, and metrics from both service and URI perspectives.
APISIX supports HTTP protocol to interact with the SkyWalking server.
| Name | Type | Required | Default | Valid values | Description |
|---|---|---|---|---|---|
| sample_ratio | number | True | 1 | [0.00001, 1] | How often to sample the requests. Setting to 1 will sample all requests. |
You can configure these attributes on your configuration file (conf/config.yaml):
| Name | Type | Default | Description |
|---|---|---|---|
| service_name | string | "APISIX" | Service name for SkyWalking reporter. |
| service_instance_name | string | "APISIX Instance Name" | Service instance name for SkyWalking reporter. Set to $hostname to get the local hostname. |
| endpoint_addr | string | "http://127.0.0.1:12800" | SkyWalking HTTP endpoint. For example, http://127.0.0.1:12800. |
| report_interval | integer | Value in the SkyWalking client library | Reporting interval time in seconds. |
You can configure these as shown below:
plugin_attr:
  skywalking:
    service_name: APISIX
    service_instance_name: "APISIX Instance Name"
endpoint_addr: http://127.0.0.1:12800import org.springframework.web.bind.annotation.PathVariable;
import org.springframework.web.bind.annotation.RequestMapping;
import org.springframework.web.bind.annotation.RestController;
import javax.servlet.http.HttpServletRequest;
@RestController
public class TestController {
@RequestMapping("/uid/{count}")
public String getUidList(@PathVariable("count") String countStr, HttpServletRequest request) {
return "OK";
}
}You can configure the SkyWalking agent while starting your service:
agent.service_name=yourservername
collector.backend_service=10.110.149.175:11800
Then, run the script:
nohup java -javaagent:/root/skywalking/app/agent/skywalking-agent.jar \
-jar /root/skywalking/app/app.jar \
--server.port=8089 \
2>&1 > /root/skywalking/app/logs/nohup.log &To enable the Plugin, you have to add it to your configuration file (conf/config.yaml):
plugins:
  - ...
  - skywalking
Once you do this, a background timer will be created to report data to the SkyWalking OAP server.
Now, you can enable the Plugin on a specific Route:
:::note
You can fetch the admin_key from config.yaml and save to an environment variable with the following command:
admin_key=$(yq '.deployment.admin.admin_key[0].key' conf/config.yaml | sed 's/"//g'):::
curl http://127.0.0.1:9180/apisix/admin/routes/1  -H "X-API-KEY: $admin_key" -X PUT -d '
{
    "methods": ["GET"],
    "uris": [
        "/uid/*"
    ],
    "plugins": {
        "skywalking": {
            "sample_ratio": 1
        }
    },
    "upstream": {
        "type": "roundrobin",
        "nodes": {
            "10.110.149.175:8089": 1
        }
    }
}'First, you need to have your SkyWalking server running.
You can run it on Docker by:
sudo docker run --name skywalking -d -p 1234:1234 -p 12800:12800 --restart always apache/skywalking-oap-server:8.7.0-es6:::tip
By default, SkyWalking uses H2 storage. You can also use Elasticsearch storage instead.
First, install Elasticsearch. You can do it on Docker by running:
sudo docker run -d --name elasticsearch -p 9200:9200 -p 9300:9300 --restart always -e "discovery.type=single-node" elasticsearch:6.7.2Optionally, you can install Elasticsearch management page, elasticsearch-hq:
sudo docker run -d --name elastic-hq -p 5000:5000 --restart always elastichq/elasticsearch-hqOnce you have Elasticsearch installed, you can start a SkyWalking server by running:
sudo docker run --name skywalking -d -p 1234:1234 -p 12800:12800 --restart always --link elasticsearch:elasticsearch -e SW_STORAGE=elasticsearch -e SW_STORAGE_ES_CLUSTER_NODES=elasticsearch:9200 apache/skywalking-oap-server:8.7.0-es6:::
You can also install SkyWalking UI to view the data. To run it on Docker:
sudo docker run --name skywalking-ui -d -p 8080:8080 --link skywalking:skywalking -e SW_OAP_ADDRESS=skywalking:12800 --restart always apache/skywalking-uiYou should be able to access the UI from your browser:
Now if you make requests to APISIX:
curl -v http://10.110.149.192:9080/uid/12HTTP/1.1 200 OK
OK
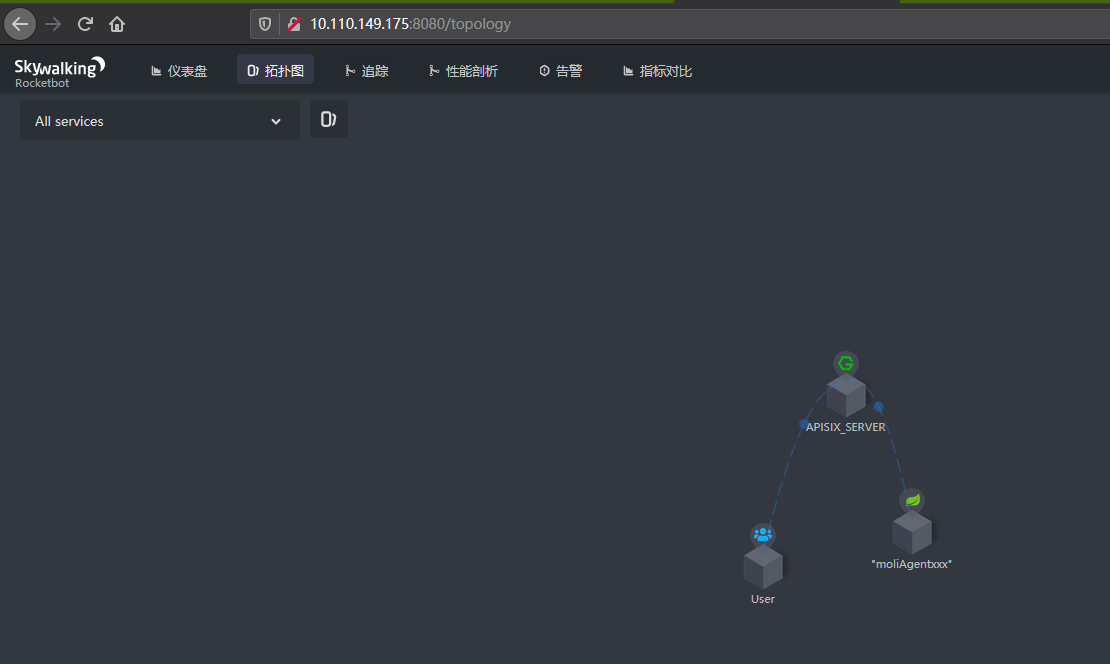
...You should be able to see the topology of all services in your SkyWalking UI:
You should also be able to see traces from all services:
To remove the skywalking Plugin, you can delete the corresponding JSON configuration from the Plugin configuration. APISIX will automatically reload and you do not have to restart for this to take effect.
curl http://127.0.0.1:9180/apisix/admin/routes/1  -H "X-API-KEY: $admin_key" -X PUT -d '
{
    "methods": ["GET"],
    "uris": [
        "/uid/*"
    ],
    "plugins": {
    },
    "upstream": {
        "type": "roundrobin",
        "nodes": {
            "10.110.149.175:8089": 1
        }
    }
}'
To completely disable the skywalking Plugin, i.e to stop the background report timer, you need to remove the Plugin from your configuration file (conf/config.yaml):
plugins:
  - ...
  # - skywalking
