Only released in EOL distros:
Package Summary
Teleoperation package that permits to control the Corobot. It also permits to connect to a distant Corobot. Data such as Camera, sensor (IR, encoder, batterie life) values can be read.
- Author: Morgan Cormier/Gang Li/[email protected]
- License: BSD
- Source: svn http://svn.code.sf.net/p/roscorobot/code/trunk/Electric/Corobot
Package Summary
Teleoperation package that permits to control the Corobot. It also permits to connect to a distant Corobot. Data such as Camera, sensor (IR, encoder, batterie life) values can be read.
- Maintainer: Morgan Cormier <mcormier AT coroware DOT com>
- Author:
- License: BSD
- Source: git https://github.com/morgancormier/corobot.git (branch: master)
Contents

Introduction
This package countains GUI that will enable you to control your Corobot, even remotely from another Linux computer.
Note that is it actually possible to control a robot from an Android device, the application is available at: CoroApp
Start the node
To start the node, either use the command:
rosrun corobot_teleop corobot_teleop
or use the configurable launch file that permits to start every other nodes for the Corobot robot:
roslaunch corobot_launch corobot_software.launch
Remote connection
Please go the the Network Setup page to see how to connect two computers together, for example a robot and the computer to control it.
GUI details
The software contains several tabs, each with a different purpose:
configuration tab
The configuration tab sets up the connection with the robot.
engineering control
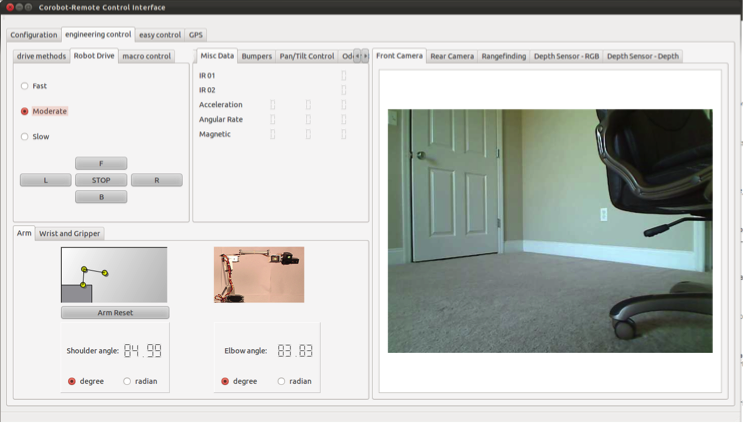
The engineering control tabs is divided in several parts:
- A drive section where it is possible to change the speed of the robot and click on the buttons F,B,L,R, stop to respectively go forward, backward, left, right and stop. Note that it is possible to use the keys W,S,A,D of the keyboard or a gamepad.
- A sensor section where it is possible to access several data like the Battery voltage, bumpers, Infrared sensors, IMU, velocity (inaccurate because calculated with the wheel encoder) and even move the camera in the case you have a pan tilt one (which can also be moved by the arrow keys on your keyboard and by a gamepad)
- A camera section where you can view the image coming from the different cameras of the robot. If you have a Kinect sensor it is also possible to view the RGB or Depth image here. Finally you can visualize the robot environment using either the infrared data or the laser range finder in the Rangefinding tab.
- An arm section where you can grab the gripper of the arm by clicking on the yellow point corresponding to it and move the arm as your mouth move. In the same way in you can change the orientation of the wrist by moving the red bar indicating the orientation, and finally open or close the gripper. Note that you can use the keys I,J,K,L to move the arm and the space key to change the state of the gripper as wheel as use a gamepad.
Easycontrol tab
The easycontrol tab contains only the front camera visualization, the Robot drive section to change the speed and control the robot with the mouse and a section to visualize the map of the environment (requires a Laser Range Finder and some configuration to display this map)
Gps tab
The Gps tab has been deactivated for the moment and only the visualization of the latitude and longitude data are working.


