Simple stand-alone programmer and debugger for AVR processors that support DebugWIRE.
Instead of expensive proprietary hardware it works with a USB UART (FT232 or CH340) or a DigiSpark/LittleWire compatible board.
This project would not have been possible without the careful investigation and documentation of the DebugWire protocol by RikusW at http://www.ruemohr.org/docs/debugwire.html.
This program is free software: you can redistribute it and/or modify it under the terms of the GNU General Public License as published by the Free Software Foundation, either version 2 of the License, or (at your option) any later version.
Built and tested on Windows 10.1, Ubuntu 15.04 and macOS 10.13.6. USB UART support requires only standard system libraries. Digispark support requires libusb-win32 installed (e.g. by zadig, see below).
The following devices have been tested: ATtiny13, ATtiny45, ATtiny84, ATtiny841, ATtiny85, ATmega168PA, ATmega328P.
The following devices are expected to work because they are alternate sizes of known working devices: ATtiny25, ATtiny24, ATmega48A, ATtiny44, ATmega48PA, ATtiny441, ATmega88A, ATtiny84, ATmega88PA, ATmega168A, ATmega168PA, ATmega328.
I have not tested but expect these to work: ATmega8U2, ATmega16U2, ATmega32U2.
I have not been able to make the ATtiny2313 work.
See: Manual
Build on linux with a conventional gcc/make setup. The binary produced is dwdebug.
Build on Windows with MinGW-w64 under cygwin. I install 32 bit cygwin and use cygwin setup to add the mingw64-i686-binutils and mingw-i686-gcc-core packages. The binary produced is dwdebug.exe.
On Linux the build requires libusb-dev installed.
On MacOS the build requires brew install libusb libusb-compat
File chooser: If the load command is used without a parameter, dwdebug will display the MS windows or GTK file chooser. (If running on a linux system with no GTK support installed the load command requires a filename parameter.)
I became frustrated that debugging an ATtiny45 required me to install MS Visual studio and AVR studio, both of which are large packages and time-consuming to download. Further a number of dependencies to install turn up along the way, and this is Windows only.
I was looking for a simple debugger of the sort used on minicomputers (DEC's DDT), or CP/M (SID) or MSDOS (DEBUG).
Additionally I hoped to connect directly to the DebugWIRE port, avoiding the complication of special-purpose hardware like the AVR-ICE or AVR-Dragon. (Although one of these is needed initially to program the DWEN fuse which enables the DebugWIRE port).
dwire-debug satisfies these goals.
As well as reducing complexity (e.g. no special drivers), connecting directly to the DebugWIRE port is noticeably faster.
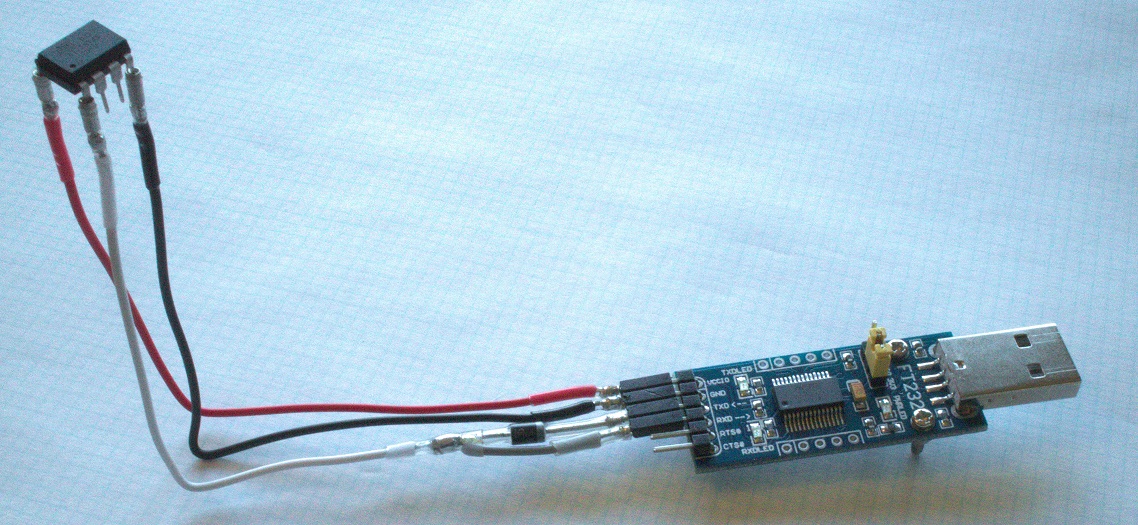
The debugger uses an FT232R or CH340 USB serial adapter with RX connected directly to the DebugWIRE port, and TX connected through a diode (a 1N914/1N4148 works fine). I used an £8.26 Foxnovo FT232R based UART from amazon.co.uk. This board has jumper selectable 3.3V/5V operation and provides power rails, making it easy to program and debug an ATtiny out of circuit.
(I have had no success with CP210x based UARTs which don't support Windows/Linux APIs for selecting custom baud rates. Further, both PL2303 based UARTS that I have tried didn't work at all for any purpose - I don't know if a good PL2303 would work.)
Connect the diode's cathode (the end marked with a line around it) to the UART txd line, and connect the diode's anode to the rxd line and to the DebugeWire pin (e.g. pin 1 on an ATtiny45).
Keep capacitance low by using short separate wires: the high voltage is generated only by the debugWIRE internal pullup in the target.
For an out of circuit connection, set the adapter to whichever voltage matches the voltage range supported by the AVR device. For an ATtiny45, either voltage is fine.
For an in-circuit connection, the Vcc power line is not connected, and setting the adapter to 5v should work for any circuit: The diode protects the circuit from any damage - it can only pull the DebugWIRE pin low - it cannot feed overvoltage to the AVR.
RSTDISBL must be programmed on the t85 in the digispark/littlewire device. All the digisparks I have seen do not have this programmed, so you will need to use (borrow?) an ISP programmer to set this fuse.
Olimex's version of the digipark has pin 1/reset/dw open circuit - but this is easily fixed with a solder bridge on the pcb trace on the bottom side of the board.
The digispark/littlewire should be programmed with the extended USBtinySPI firmware found at usbtiny/main.hex. This firmware includes all littlewire functionality, and adds support for reading, writing and measuring the baud rate of debuWIRE.
On Windows it is necessary to install libusb-win32 drivers and configure them for the USBtinySPI device. By far the easiest way to do this I have found is to use the Zadig USB driver installer found at http://zadig.akeo.ie/. With the digispark/littlewire plugged in, download and run the latest Zadig software. Select USBtinySPI from the main dropdown box (topmost control in the dialog). Make sure the driver selected to the right of the fat green arrow is libusb-win32 ... and click the Install Driver button immediately below it.
The target AVR must have DebugWIRE (DWEN) enabled. DWEN is not enabled in chips as shipped from Atmel, and (perhaps not surprisingly) cannot be enabled through DebugWIRE.
For a chip as supplied by Atmel, ISP programming will be sufficient to enable debugWIRE. You can use any ISP programming solution, for example:
- ISP software includes the open source Avrdude or the official Atmel Studio.
- ISP hardware includes any littlewire device, the open source Arduino ISP, or Atmel's Dragon or AVR-ICE.
Once the DWEN fuse has been programmed (set to zero), disconnect the ISP.
Now it is sufficient to connect the USB UART or the DigiSpark/LittleWire to the target with just two wires - ground and the debugeWIRE pin. Now dwire-debug is sufficient for both programming and debugging.
