Deepfence ThreatMapper helps you to monitor and secure your running applications, in Cloud, Kubernetes, Docker, and Fargate Serverless.
Your 'Shift Left' initiatives enable you to deliver secure applications; ThreatMapper picks up where 'Shift Left' ends:
- Discover Running Workloads: ThreatMapper scans your platforms and identifies pods, containers, applications, and infrastructure. Use ThreatMapper to discover the topology of your applications and attack surface.
- Discover Vulnerabilities: ThreatMapper obtains manifests of dependencies from running pods and containers, serverless apps, applications, and operating system. ThreatMapper matches these against vulnerability feeds to identify vulnerable components.
- Rank Vulnerabilities by Risk-of-Exploit: ThreatMapper ranks discovered vulnerabilities against CVSS and other severity scores, exploit method and proximity to attack surface, in order to identify which issues pose the greatest risk of exploit.
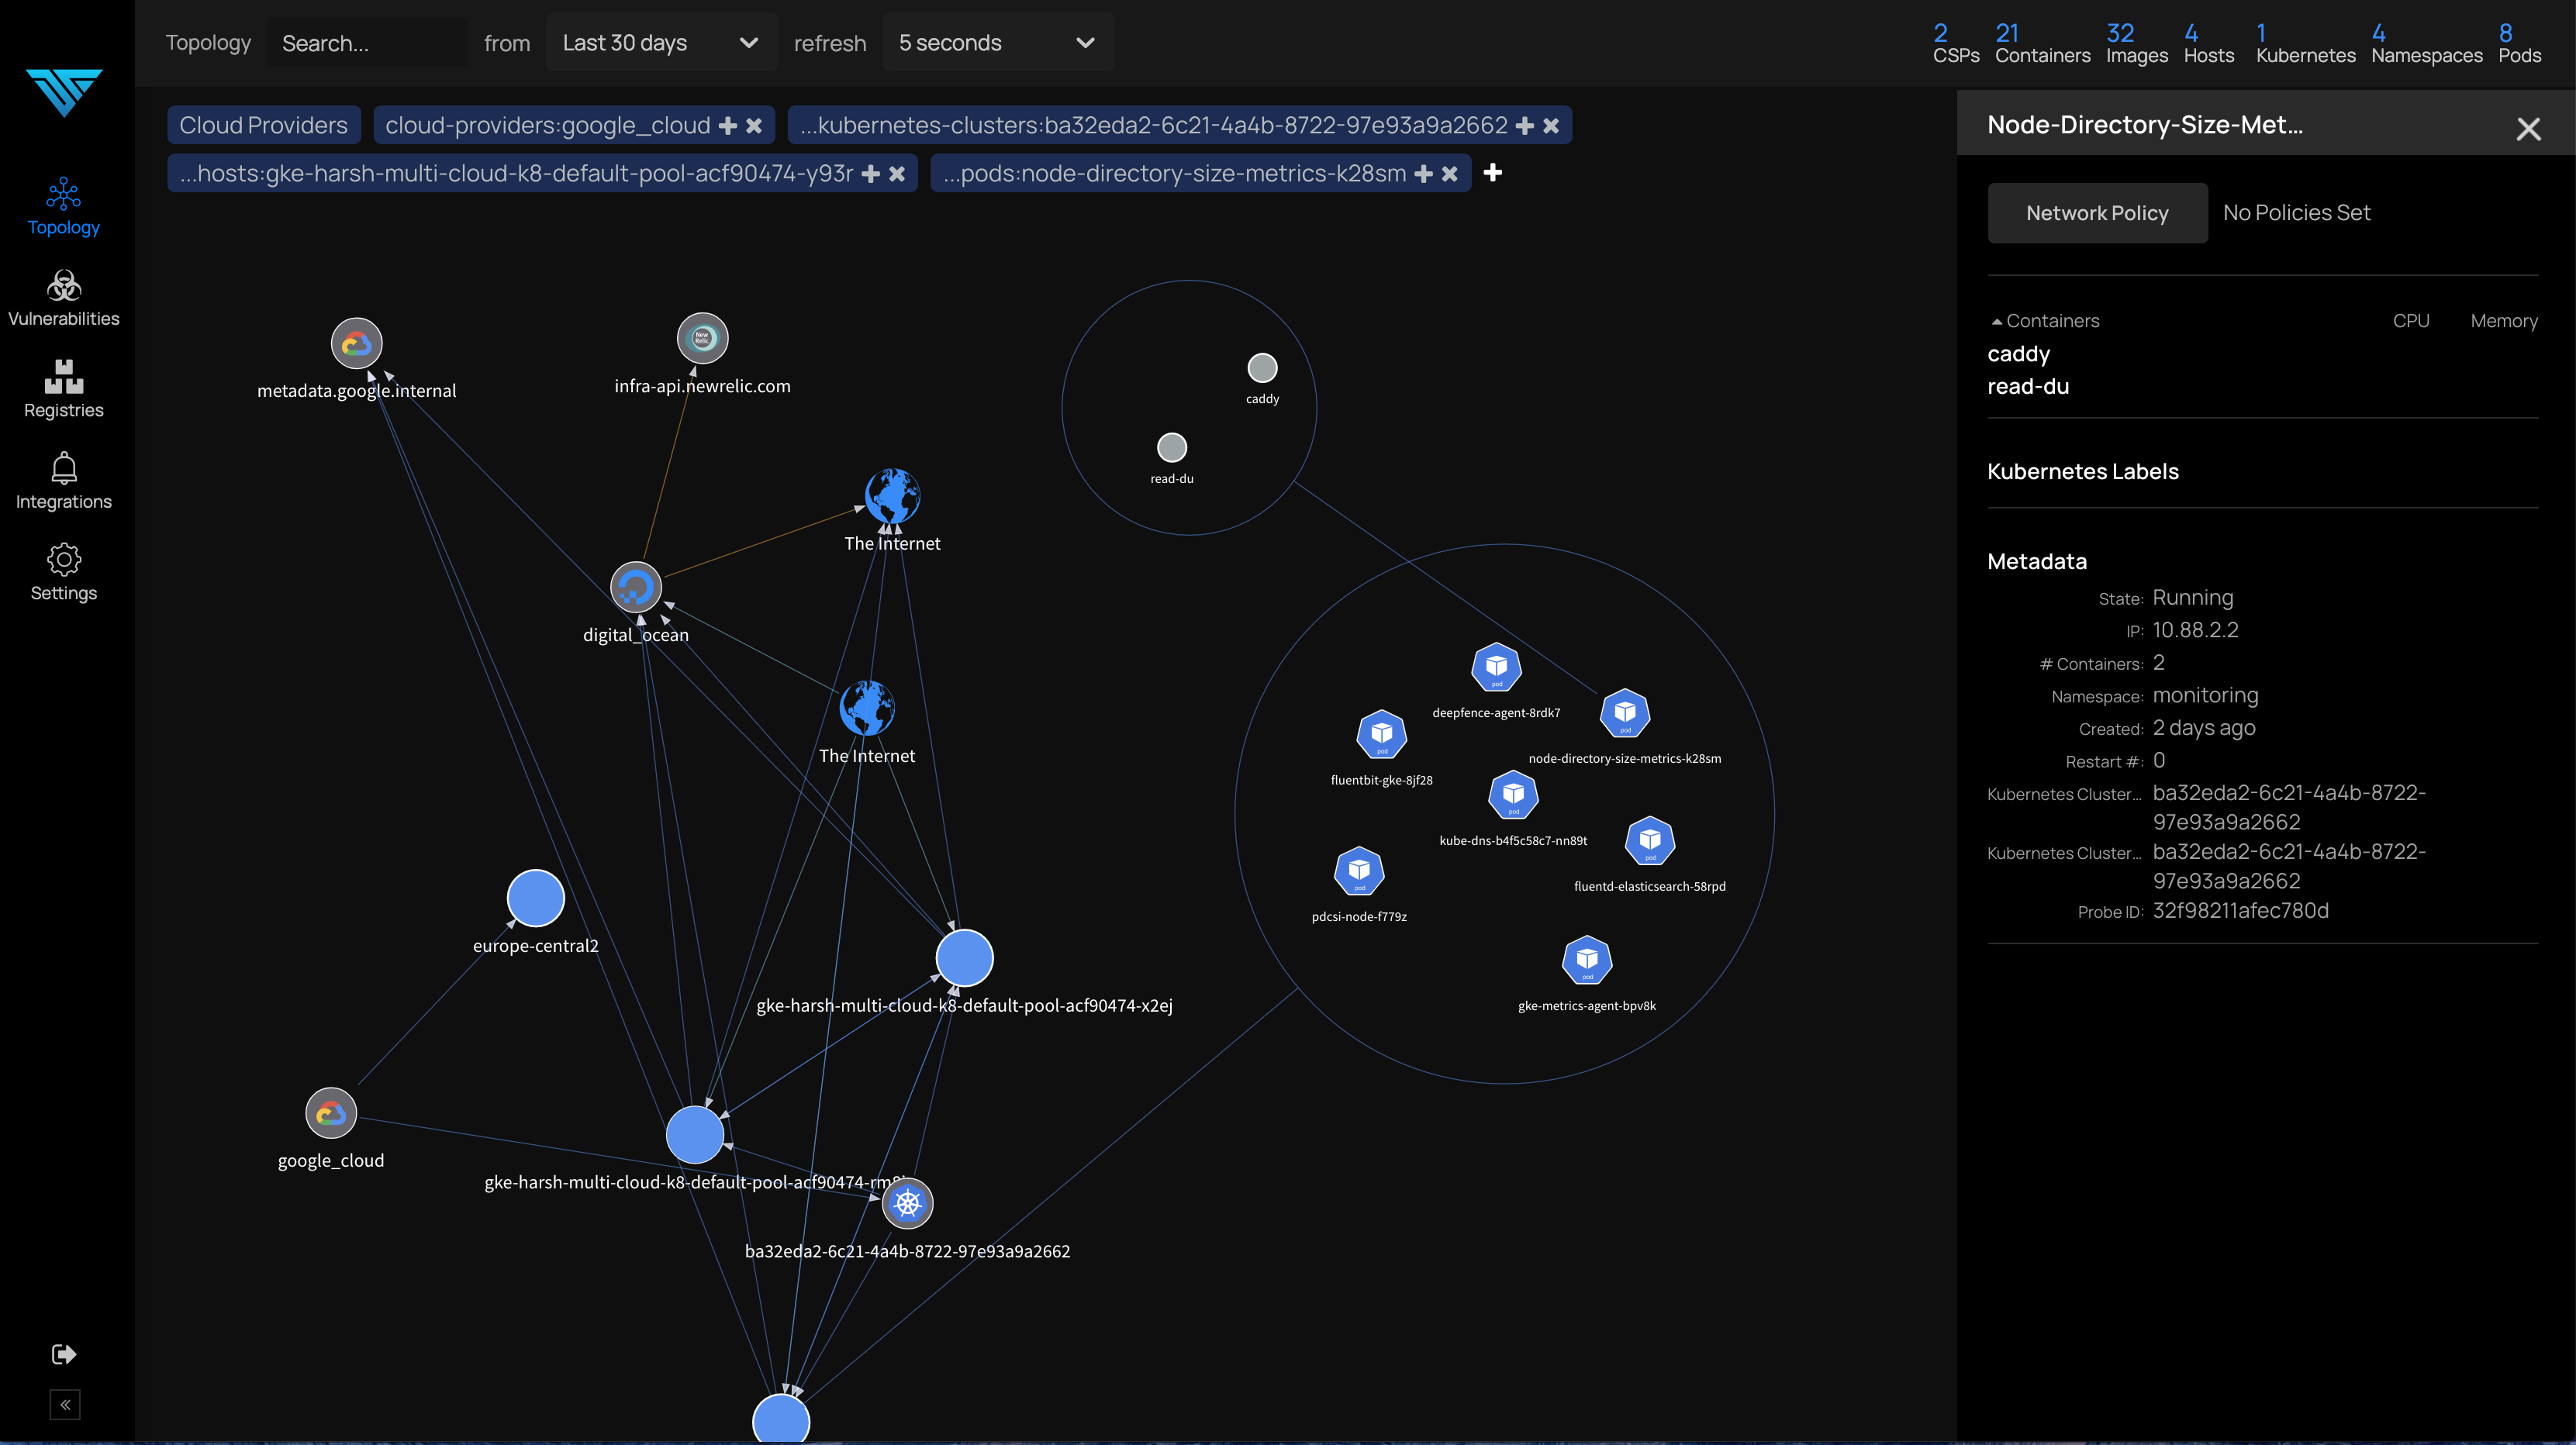
ThreatMapper discovers, annotates and displays the topology of your applications across multiple cloud environments:
Get in touch:
Got a question, need some help? Find the Deepfence team on Slack
- https://github.com/deepfence/ThreatMapper/issues: Got a feature request or found a bug? Raise an issue
- productsecurity at deepfence dot io: Found a security issue? Share it in confidence
- Read the additional documentation in the Deepfence ThreatMapper wiki
- Find out more at deepfence.io
- What is ThreatMapper?
- Prerequisites
- ThreatMapper QuickStart
- Build from Source
- Next Steps
- Roadmap
- Security and Support
- Deepfence ThreatStryker
- Acknowledgements
- License
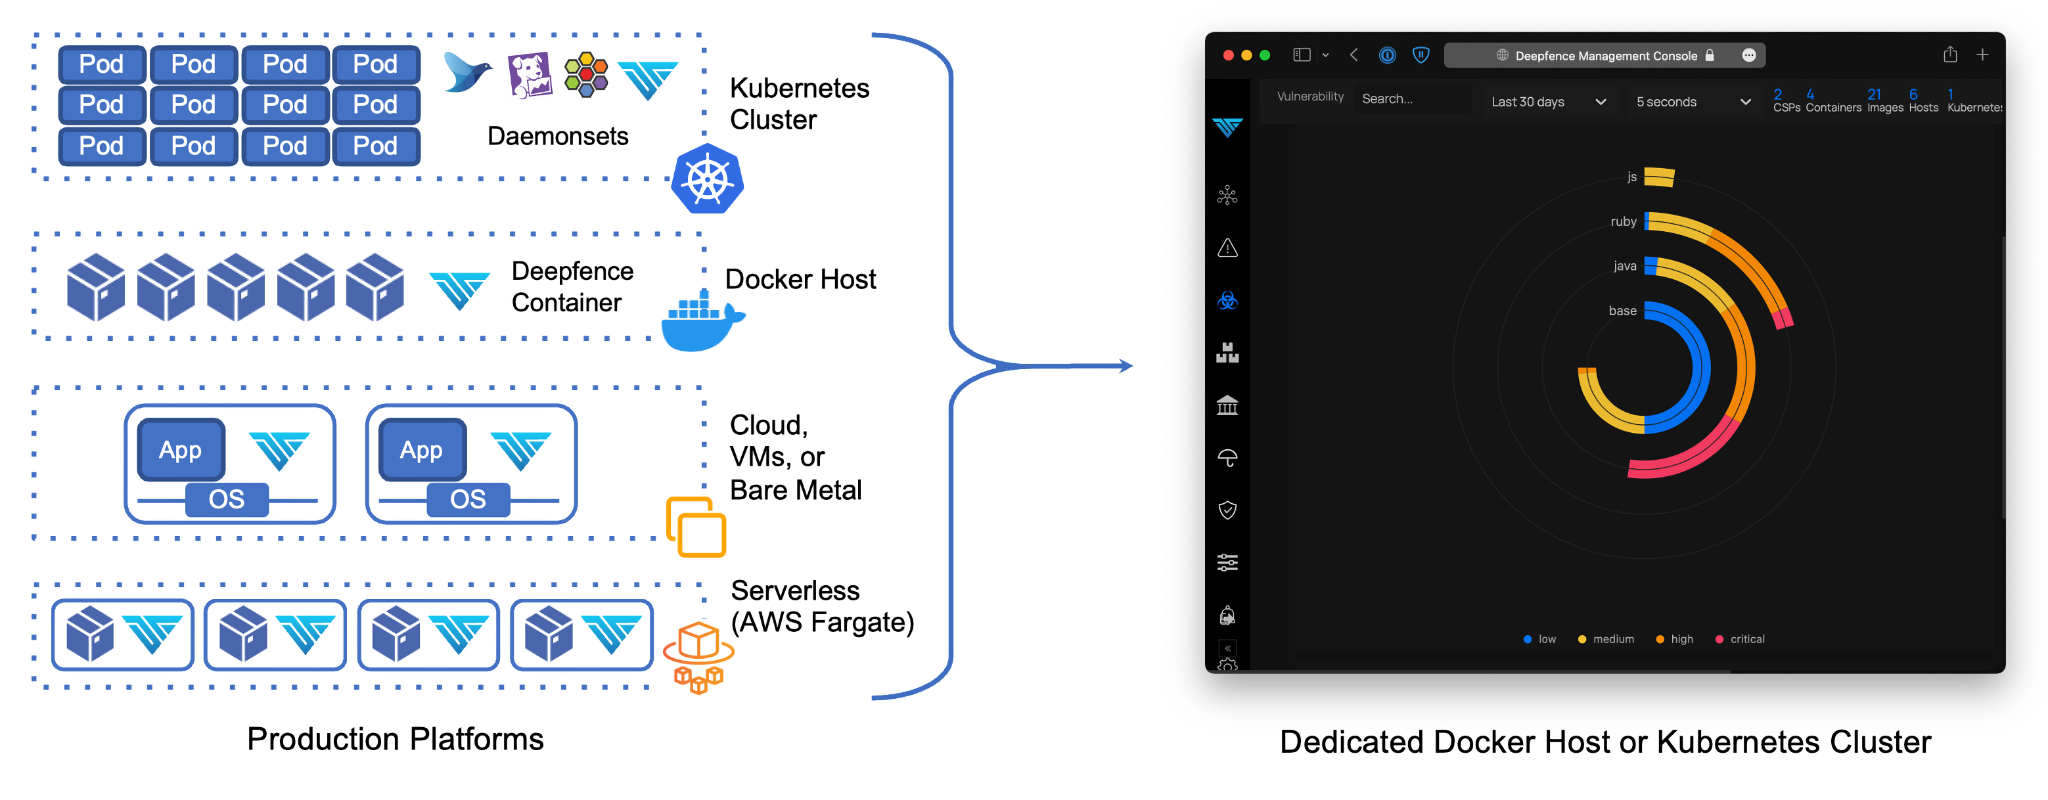
Deepfence ThreatMapper consists of two components - the Deepfence Management Console, and a series of Deepfence Sensors. The sensors should be deployed within your production platforms, and they forward manifests and telemetry securely to your dedicated console. The console calculates the topology of your applications, interrogates manifests to find vulnerabilities, and displays a 'Threat Map' for your applications.
The Deepfence Management Console ("Console") is a standalone application, implemented as a fleet of containers. It should be deployed on either a single docker host, or (for larger deployments) a dedicated Kubernetes cluster. The console is self-contained, and exposes an HTTPS interface for administration and API automation.
The console allows you to:
- Manage the users who can access the console .
- Visualize and drill down into Kubernetes clusters, virtual machines, containers and images, running processes, and network connections in near real time.
- Invoke vulnerability scans on running containers and applications and review the results, ranked by risk-of-exploit.
- Invoke vulnerability scans on infrastructure hosts, manually or automatically when they are added to a cluster.
- Scan container registries for vulnerabilities, to review workloads before they are deployed.
- Scan image builds during the CI/CD pipeline, supporting CircleCI, Jenkins, and GitLab.
- Configure integrations with external notification, SIEM and ticketing systems, including Slack, PagerDuty, Jira, Splunk, ELK, Sumo Logic, and Amazon S3.
Deepfence ThreatMapper supports multiple production deployments simultaneously, so that you can visualize and scan workloads across a large production estate.
Deepfence Sensors are deployed on your production platforms. They communicate securely with your Deepfence Management Console, taking instructions to perform scans, and forwarding telemetry data.
The sensors support a range of production platforms:
- Kubernetes: The sensors are deployed as a daemonset, similar to other kubernetes services.
- Docker: The sensor is deployed as a docker container on each docker host.
- Bare metal and VM-based platforms: Sensors are deployed as a Docker container on each operating system instance, using a Docker runtime. Both Windows and Linux instances are supported.
- AWS Fargate The sensor is deployed as a daemon service alongside each serverless instance.
| Feature | Requirements |
|---|---|
| CPU: No of cores | 4 |
| RAM | 16 GB |
| Disk space | At-least 120 GB |
| Telemetry and data from Deepfence Sensors | Port 8000, firewalled |
| Administrative and API access | Port 443, firewalled |
| Docker binaries | Version 18.03 or later |
| Docker-compose binary | Version 1.20.1 |
Larger deployments, managing 250 or more production nodes, will require additional CPU and RAM resources. For enterprise-scale deployments, managing 1000+ production nodes, the ThreatMapper Console should be deployed on a Kubernetes cluster of 3 or more nodes.
You should secure (firewall) the sensor port (8000) and admin port (443) so that only authorized hosts can connect.
Production nodes should meet the following prerequisites:
| Feature | Requirements |
|---|---|
| CPU: No of cores | 2 |
| RAM | 1 GB |
| Disk space | At-least 30 GB |
| Linux kernel version | >= 4.4 |
| Docker binaries | Version 18.03 or later |
| Connectivity | Access to Deepfence Management Console IP address, port 8000 |
These quickstart instructions use pre-built Deepfence ThreatMapper containers from DockerHub.
The following instuctions explain how to get started with a docker-based install on a single host system. Please verify the prerequisites before proceeding.
- Download the file docker-compose.yml to the system that will host the Console
- Execute the following command to install and start the Console
docker-compose -f docker-compose.yml up -d
- Open the Console in a browser (https://x.x.x.x) and register a new account. Once one user has been registered, additional users are added by invitation from an admin user.
- Obtain the Deepfence API key from the console. Go to
Settings->User Managementand make note of the API key; you will need it when deploying the Deepfence sensors.
Once the Console has started, it will begin to acquire the Threat Intel feed data; this can take several minutes, or up to an hour. You can check the status on the Console, at Settings -> Diagnosis; look for the System Status report.
For more information, read the 'Advanced Installation Notes'
Do verify the prerequisites before proceeding. Additionally, before you begin:
- Ensure you have the Deepfence API key and Deepfence Console IP address available. If needed, you can obtain the API key from
Settings->User Managementin the Console - Ensure that the host systems for the sensors can connect to port 8000 on the Console IP address.
Run the following command to start the Deepfence Sensor on the Docker host:
docker run -dit --cpus=".2" --name=deepfence-agent --restart on-failure --pid=host --net=host \
  --privileged=true -v /sys/kernel/debug:/sys/kernel/debug:rw -v /var/log/fenced \
  -v /var/run/docker.sock:/var/run/docker.sock -v /:/fenced/mnt/host/:ro \
  -e USER_DEFINED_TAGS="" -e DF_BACKEND_IP="---CONSOLE-IP---" -e DEEPFENCE_KEY="---DEEPFENCE-API-KEY---" \
  deepfenceio/deepfence_agent_ce:latest
Optionally the sensor container can be tagged using USER_DEFINED_TAGS="" in the above command. Tags should be comma separated, for example, "dev,front-end".
The Deepfence Sensor is most easily deployed using the Helm chart. Use helm version to determine whether you are using Helm v2.x or v3.x:
helm repo add deepfence https://deepfence-helm-charts.s3.amazonaws.com/threatmapper
helm show readme deepfence/deepfence-agent
helm show values deepfence/deepfence-agent

# helm v2
helm install deepfence/deepfence-agent \
    --name=deepfence-agent \
    --set managementConsoleIp=---CONSOLE-IP--- \
    --set deepfenceKey=---DEEPFENCE-API-KEY---

# helm v3
helm install deepfence-agent deepfence/deepfence-agent \
    --set managementConsoleIp=---CONSOLE-IP--- \
    --set deepfenceKey=---DEEPFENCE-API-KEY---
To remove the Deepfence Sensor:
# helm v2
helm delete --purge deepfence-agent

# helm v3
helm delete deepfence-agentFor detailed instructions to deploy agents on Amazon ECS, please refer to our Amazon ECS wiki page.
For detailed instructions to deploy agents on Google GKE, please refer to our Google GKE wiki page.
For detailed instructions to deploy agents on Azure Kubernetes Service, please refer to our Azure AKS wiki page.
Install an appropriate docker runtime on the host operating system (Linux and Windows are supported). You can then follow the 'Installing on a Docker Host' steps to manage and observe the virtual machine or bare metal server with ThreatMapper.
Deepfence ThreatMapper is open source. The container repos will contain the most recent, fully-tested versions of the ThreatMpper components, but developers and early adopters can build ThreatMapper from source.
Begin with the ThreatMapper Building from Source instructions.
Check out the Deepfence ThreatMapper wiki for how to get started with using Deepfence ThreatMapper.
The immediate ThreatMapper priorities address stability, usability, and security.
Deepfence ThreatMapper is derived from an earlier, closed-source product. Over the next 6 months, we plan to migrate much of the current closed-source functionality into ThreatMapper open source, adding:
- Compliance scanning for hosts and containers, using OpenSCAP profiles: Standard System Security Profile, CIS Profile, NIST Kube Master, NIST Kube Slave, PCI-DSS Profile, HIPAA Profile, NIST Mission Critical
- Additional run-time sensors: resource anomalies (CPU and Network), Indicators of Compromise (on-host file and process integrity events), Indicators of Attack (network DPI)
Our goal is to build the ThreatMapper 'Security-Observability' open source platform by making all topology, vulnerability and sensor data available though a future set of open APIs.
Please share any feature requests or bug reports: https://github.com/deepfence/ThreatMapper/issues
For any security-related issues in the ThreatMapper project, contact productsecurity at deepfence dot io.
Please file Github issues as needed, and join the Deepfence Community Slack channel.
Deepfence ThreatStryker is an extended version of ThreatMapper that provides:
- Compliance Checking
- Runtime Sensors
- Correlation and Attack Intelligence
- Automated Remediation (Quarantine and Firewalling)
ThreatStryker is fully supported by Deepfence, Inc. For more information, check out Deepfence ThreatStryker.
The Deepfence ThreatMapper project builds on a number of open source tools. We are particularly grateful to, and would like to acknowledge:
- WeaveWorks Weave Scope: Weave Scope is a visualization and monitoring tool for Docker and Kubernetes. It provides a top down view into your app, as well as your entire infrastructure. Weave Scope provide the core of the Topology visualization in the Deepfence Management Console.
- Clair: Clair is an open source project for the static analysis of vulnerabilities in application containers. Clair consumes a number of vulnerability feeds and matches these against manifests from containers. Deepfence ThreatMapper uses clair as one of the tools to locate vulnerabilities in workloads.
- DependencyCheck: DependencyCheck is a Software Composition Analysis tool that matches an application's dependencies against various lists publically-disclosed vulnerabilities. Deepfence ThreatMapper uses DependencyCheck as one of the tools to locate vulnerabilities in workloads.
The Deepfence ThreatMapper project (this repository) is offered under the Apache2 license.
Contributions to Deepfence ThreatMapper project are similarly accepted under the Apache2 license, as per GitHub's inbound=outbound policy.


