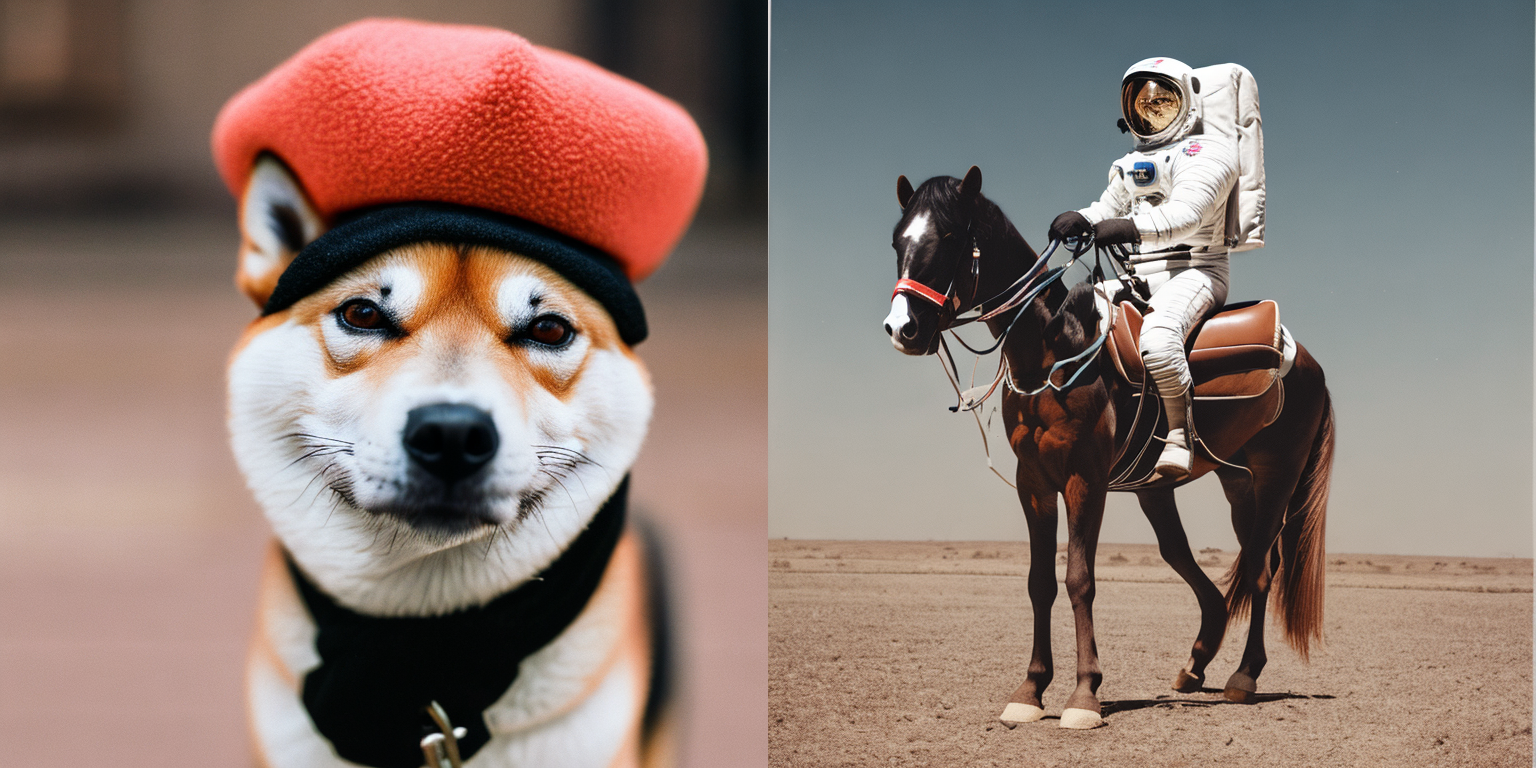
This repository contains Stable Diffusion models trained from scratch and will be continuously updated with new checkpoints. The following list provides an overview of all currently available models. More coming soon.
March 24, 2023
Stable UnCLIP 2.1
-
New stable diffusion finetune (Stable unCLIP 2.1, Hugging Face) at 768x768 resolution, based on SD2.1-768. This model allows for image variations and mixing operations as described in Hierarchical Text-Conditional Image Generation with CLIP Latents, and, thanks to its modularity, can be combined with other models such as KARLO. Comes in two variants: Stable unCLIP-L and Stable unCLIP-H, which are conditioned on CLIP ViT-L and ViT-H image embeddings, respectively. Instructions are available here.
-
A public demo of SD-unCLIP is already available at clipdrop.co/stable-diffusion-reimagine
December 7, 2022
Version 2.1
- New stable diffusion model (Stable Diffusion 2.1-v, Hugging Face) at 768x768 resolution and (Stable Diffusion 2.1-base, HuggingFace) at 512x512 resolution, both based on the same number of parameters and architecture as 2.0 and fine-tuned on 2.0, on a less restrictive NSFW filtering of the LAION-5B dataset.
Per default, the attention operation of the model is evaluated at full precision when
xformersis not installed. To enable fp16 (which can cause numerical instabilities with the vanilla attention module on the v2.1 model) , run your script withATTN_PRECISION=fp16 python <thescript.py>
November 24, 2022
Version 2.0
-
New stable diffusion model (Stable Diffusion 2.0-v) at 768x768 resolution. Same number of parameters in the U-Net as 1.5, but uses OpenCLIP-ViT/H as the text encoder and is trained from scratch. SD 2.0-v is a so-called v-prediction model.
-
The above model is finetuned from SD 2.0-base, which was trained as a standard noise-prediction model on 512x512 images and is also made available.
-
New depth-guided stable diffusion model, finetuned from SD 2.0-base. The model is conditioned on monocular depth estimates inferred via MiDaS and can be used for structure-preserving img2img and shape-conditional synthesis.
-
A text-guided inpainting model, finetuned from SD 2.0-base.
We follow the original repository and provide basic inference scripts to sample from the models.
The original Stable Diffusion model was created in a collaboration with CompVis and RunwayML and builds upon the work:
High-Resolution Image Synthesis with Latent Diffusion Models
Robin Rombach*,
Andreas Blattmann*,
Dominik Lorenz,
Patrick Esser,
Björn Ommer
CVPR '22 Oral |
GitHub | arXiv | Project page
and many others.
Stable Diffusion is a latent text-to-image diffusion model.
You can update an existing latent diffusion environment by running
conda install pytorch==1.12.1 torchvision==0.13.1 -c pytorch
pip install transformers==4.19.2 diffusers invisible-watermark
pip install -e .
For more efficiency and speed on GPUs, we highly recommended installing the xformers library.
Tested on A100 with CUDA 11.4. Installation needs a somewhat recent version of nvcc and gcc/g++, obtain those, e.g., via
export CUDA_HOME=/usr/local/cuda-11.4
conda install -c nvidia/label/cuda-11.4.0 cuda-nvcc
conda install -c conda-forge gcc
conda install -c conda-forge gxx_linux-64==9.5.0
Then, run the following (compiling takes up to 30 min).
cd ..
git clone https://github.com/facebookresearch/xformers.git
cd xformers
git submodule update --init --recursive
pip install -r requirements.txt
pip install -e .
cd ../stablediffusion
Upon successful installation, the code will automatically default to memory efficient attention for the self- and cross-attention layers in the U-Net and autoencoder.
Stable Diffusion models are general text-to-image diffusion models and therefore mirror biases and (mis-)conceptions that are present in their training data. Although efforts were made to reduce the inclusion of explicit pornographic material, we do not recommend using the provided weights for services or products without additional safety mechanisms and considerations. The weights are research artifacts and should be treated as such. Details on the training procedure and data, as well as the intended use of the model can be found in the corresponding model card. The weights are available via the StabilityAI organization at Hugging Face under the CreativeML Open RAIL++-M License.
Stable Diffusion v2 refers to a specific configuration of the model architecture that uses a downsampling-factor 8 autoencoder with an 865M UNet and OpenCLIP ViT-H/14 text encoder for the diffusion model. The SD 2-v model produces 768x768 px outputs.
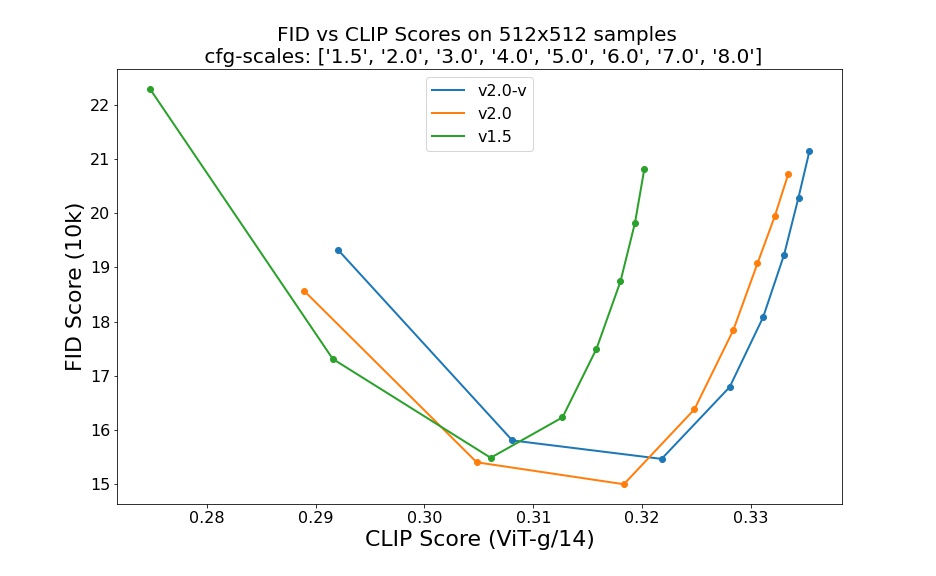
Evaluations with different classifier-free guidance scales (1.5, 2.0, 3.0, 4.0, 5.0, 6.0, 7.0, 8.0) and 50 DDIM sampling steps show the relative improvements of the checkpoints:
Stable Diffusion 2 is a latent diffusion model conditioned on the penultimate text embeddings of a CLIP ViT-H/14 text encoder. We provide a reference script for sampling.
This script incorporates an invisible watermarking of the outputs, to help viewers identify the images as machine-generated. We provide the configs for the SD2-v (768px) and SD2-base (512px) model.
First, download the weights for SD2.1-v and SD2.1-base.
To sample from the SD2.1-v model, run the following:
python scripts/txt2img.py --prompt "a professional photograph of an astronaut riding a horse" --ckpt <path/to/768model.ckpt/> --config configs/stable-diffusion/v2-inference-v.yaml --H 768 --W 768
To sample from the base model, use
python scripts/txt2img.py --prompt "a professional photograph of an astronaut riding a horse" --ckpt <path/to/model.ckpt/> --config <path/to/config.yaml/>
By default, this uses the DDIM sampler, and renders images of size 768x768 (which it was trained on) in 50 steps. Empirically, the v-models can be sampled with higher guidance scales.
Note: The inference config for all model versions is designed to be used with EMA-only checkpoints.
For this reason use_ema=False is set in the configuration, otherwise the code will try to switch from
non-EMA to EMA weights.
If you're planning on running Text-to-Image on Intel® CPU, try to sample an image with TorchScript and Intel® Extension for PyTorch* optimizations. Intel® Extension for PyTorch* extends PyTorch by enabling up-to-date features optimizations for an extra performance boost on Intel® hardware. It can optimize memory layout of the operators to Channel Last memory format, which is generally beneficial for Intel CPUs, take advantage of the most advanced instruction set available on a machine, optimize operators and many more.
Prerequisites
Before running the script, make sure you have all needed libraries installed. (the optimization was checked on Ubuntu 20.04). Install jemalloc, numactl, Intel® OpenMP and Intel® Extension for PyTorch*.
apt-get install numactl libjemalloc-dev
pip install intel-openmp
pip install intel_extension_for_pytorch -f https://software.intel.com/ipex-whl-stable
To sample from the SD2.1-v model with TorchScript+IPEX optimizations, run the following. Remember to specify desired number of instances you want to run the program on (more).
MALLOC_CONF=oversize_threshold:1,background_thread:true,metadata_thp:auto,dirty_decay_ms:9000000000,muzzy_decay_ms:9000000000 python -m intel_extension_for_pytorch.cpu.launch --ninstance <number of an instance> --enable_jemalloc scripts/txt2img.py --prompt \"a corgi is playing guitar, oil on canvas\" --ckpt <path/to/768model.ckpt/> --config configs/stable-diffusion/intel/v2-inference-v-fp32.yaml --H 768 --W 768 --precision full --device cpu --torchscript --ipex
To sample from the base model with IPEX optimizations, use
MALLOC_CONF=oversize_threshold:1,background_thread:true,metadata_thp:auto,dirty_decay_ms:9000000000,muzzy_decay_ms:9000000000 python -m intel_extension_for_pytorch.cpu.launch --ninstance <number of an instance> --enable_jemalloc scripts/txt2img.py --prompt \"a corgi is playing guitar, oil on canvas\" --ckpt <path/to/model.ckpt/> --config configs/stable-diffusion/intel/v2-inference-fp32.yaml --n_samples 1 --n_iter 4 --precision full --device cpu --torchscript --ipex
If you're using a CPU that supports bfloat16, consider sample from the model with bfloat16 enabled for a performance boost, like so
# SD2.1-v
MALLOC_CONF=oversize_threshold:1,background_thread:true,metadata_thp:auto,dirty_decay_ms:9000000000,muzzy_decay_ms:9000000000 python -m intel_extension_for_pytorch.cpu.launch --ninstance <number of an instance> --enable_jemalloc scripts/txt2img.py --prompt \"a corgi is playing guitar, oil on canvas\" --ckpt <path/to/768model.ckpt/> --config configs/stable-diffusion/intel/v2-inference-v-bf16.yaml --H 768 --W 768 --precision full --device cpu --torchscript --ipex --bf16
# SD2.1-base
MALLOC_CONF=oversize_threshold:1,background_thread:true,metadata_thp:auto,dirty_decay_ms:9000000000,muzzy_decay_ms:9000000000 python -m intel_extension_for_pytorch.cpu.launch --ninstance <number of an instance> --enable_jemalloc scripts/txt2img.py --prompt \"a corgi is playing guitar, oil on canvas\" --ckpt <path/to/model.ckpt/> --config configs/stable-diffusion/intel/v2-inference-bf16.yaml --precision full --device cpu --torchscript --ipex --bf16To augment the well-established img2img functionality of Stable Diffusion, we provide a shape-preserving stable diffusion model.
Note that the original method for image modification introduces significant semantic changes w.r.t. the initial image.
If that is not desired, download our depth-conditional stable diffusion model and the dpt_hybrid MiDaS model weights, place the latter in a folder midas_models and sample via
python scripts/gradio/depth2img.py configs/stable-diffusion/v2-midas-inference.yaml <path-to-ckpt>
or
streamlit run scripts/streamlit/depth2img.py configs/stable-diffusion/v2-midas-inference.yaml <path-to-ckpt>
This method can be used on the samples of the base model itself.
For example, take this sample generated by an anonymous discord user.
Using the gradio or streamlit script depth2img.py, the MiDaS model first infers a monocular depth estimate given this input,
and the diffusion model is then conditioned on the (relative) depth output.
This model is particularly useful for a photorealistic style; see the examples. For a maximum strength of 1.0, the model removes all pixel-based information and only relies on the text prompt and the inferred monocular depth estimate.
For running the "classic" img2img, use
python scripts/img2img.py --prompt "A fantasy landscape, trending on artstation" --init-img <path-to-img.jpg> --strength 0.8 --ckpt <path/to/model.ckpt>
and adapt the checkpoint and config paths accordingly.
 After downloading the weights, run
python scripts/gradio/superresolution.py configs/stable-diffusion/x4-upscaling.yaml <path-to-checkpoint>
or
streamlit run scripts/streamlit/superresolution.py -- configs/stable-diffusion/x4-upscaling.yaml <path-to-checkpoint>
for a Gradio or Streamlit demo of the text-guided x4 superresolution model.
This model can be used both on real inputs and on synthesized examples. For the latter, we recommend setting a higher
noise_level, e.g. noise_level=100.
Download the SD 2.0-inpainting checkpoint and run
python scripts/gradio/inpainting.py configs/stable-diffusion/v2-inpainting-inference.yaml <path-to-checkpoint>
or
streamlit run scripts/streamlit/inpainting.py -- configs/stable-diffusion/v2-inpainting-inference.yaml <path-to-checkpoint>
for a Gradio or Streamlit demo of the inpainting model. This scripts adds invisible watermarking to the demo in the RunwayML repository, but both should work interchangeably with the checkpoints/configs.
- Thanks to Hugging Face and in particular Apolinário for support with our model releases!
- Stable Diffusion would not be possible without LAION and their efforts to create open, large-scale datasets.
- The DeepFloyd team at Stability AI, for creating the subset of LAION-5B dataset used to train the model.
- Stable Diffusion 2.0 uses OpenCLIP, trained by Romain Beaumont.
- Our codebase for the diffusion models builds heavily on OpenAI's ADM codebase and https://github.com/lucidrains/denoising-diffusion-pytorch. Thanks for open-sourcing!
- CompVis initial stable diffusion release
- Patrick's implementation of the streamlit demo for inpainting.
img2imgis an application of SDEdit by Chenlin Meng from the Stanford AI Lab.- Kat's implementation of the PLMS sampler, and more.
- DPMSolver integration by Cheng Lu.
- Facebook's xformers for efficient attention computation.
- MiDaS for monocular depth estimation.
The code in this repository is released under the MIT License.
The weights are available via the StabilityAI organization at Hugging Face, and released under the CreativeML Open RAIL++-M License License.
@misc{rombach2021highresolution,
      title={High-Resolution Image Synthesis with Latent Diffusion Models},
      author={Robin Rombach and Andreas Blattmann and Dominik Lorenz and Patrick Esser and Björn Ommer},
      year={2021},
      eprint={2112.10752},
      archivePrefix={arXiv},
      primaryClass={cs.CV}
}


