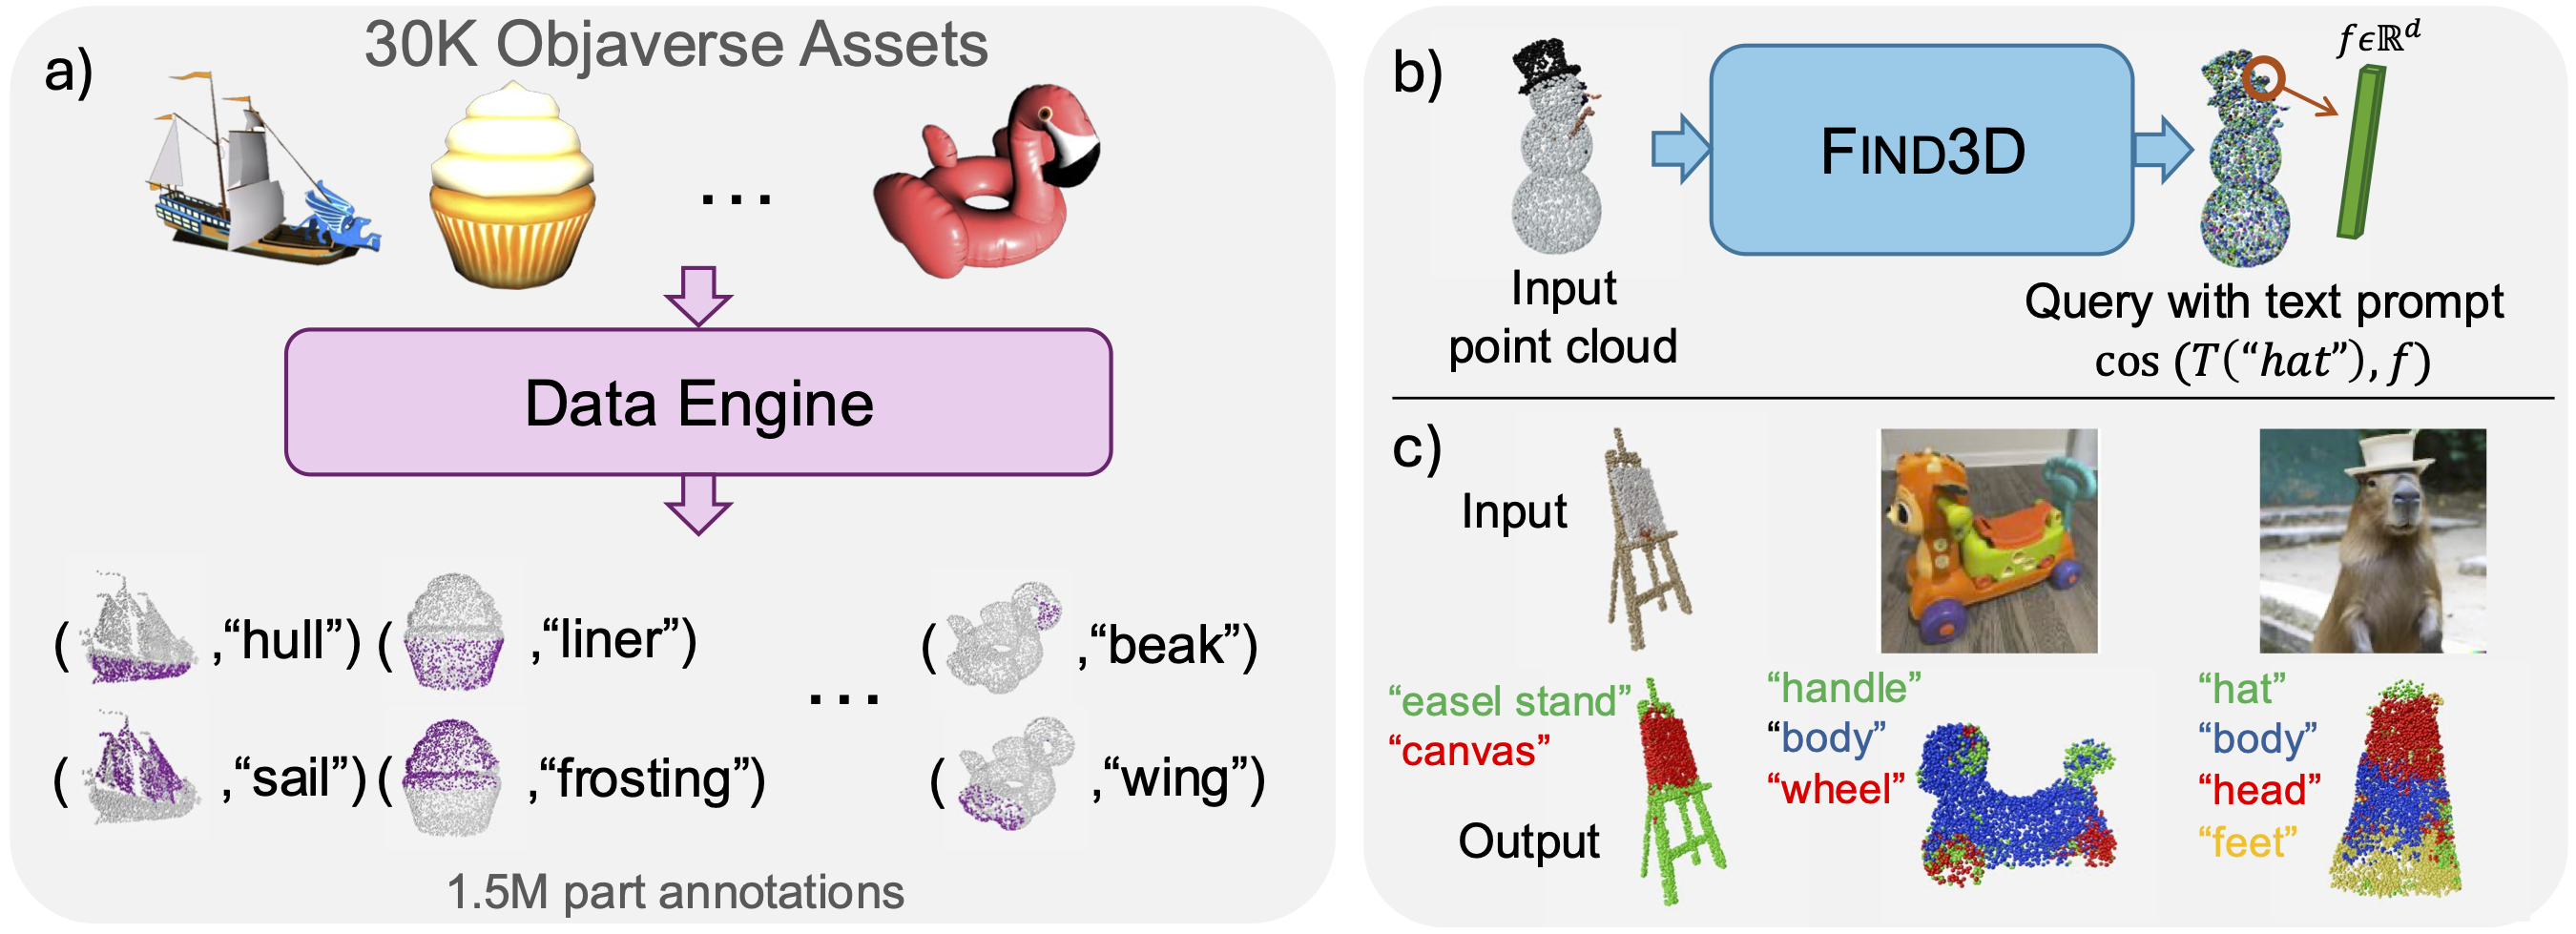
Find3D: training a model to segment any part in any object based on any text query using 3D assets from the internet
Ziqi Ma, Yisong Yue, Georgia Gkioxari
[Project Page] [arXiv] [Gradio Demo]
- Overview
- Environment Setup
- Dataset
- Data Engine
- Inference on Benchmarks
- Inference in the Wild (Demo)
- Training
- Citing
Find3D consists of a data engine which automatically annotates training data and an open-world 3D part segmentation model trained on diverse objects provided by the data engine. We share code both for the data engine and the model. Scripts for various steps of the data engine are explained in dataengine/README.md. Below we demonstrate how to perform inference both on benchmarks and on user-provided point cloud files with Find3D. We also provide the command to train Find3D from scratch.
Both the data engine and the Find3D model require GPU with cuda support. The data engine and the model requires different environments. The data engine environment setup can be found in dataengine/README.md. Below we share the model environment.
cd model
conda create -n find3d python=3.8
pip install -r requirements.txt
Build Pointcept from source
git clone https://github.com/Pointcept/Pointcept.git
cd /Pointcept/libs/pointops
python setup.py install
cd ../../..
Build FlashAttention from source
git clone https://github.com/Dao-AILab/flash-attention.git
cd flash-attention MAX_JOBS=4 python setup.py install
cd ..
Building FlashAttention might take up to three hours.
See model/evaluation/benchmark/README.md for instructions on downloading the benchmarks for evaluation.
The environment setup for the data engine, as well as scripts for various steps, are detailed in dataengine/README.md.
To run inference on benchmarks, please first download the benchmark data according to the Dataset section. We provide a trained checkpoint here.
Please run the following scripts in the model folder, and set the PYTHONPATH before running inference:
cd model
export PYTHONPATH=[path to Find3D]
Evaluation configurations can be changed via flags:
By default, "part of a object" query is used. One can set --part_query flag to use "part" query on all benchmarks, or set --use_shapenetpart_topk_prompt flag to use the topk prompt (following PointCLIPV2) for ShapeNetPart or Objaverse-ShapeNetPart.
By default, evaluation is done on the full set. One can set --subset flag to evaluate on subset of ShapeNetPart and PartNetE.
By default, rotation is applied to all objects. On ShapeNetPart and PartNetE, one can set --canonical flag to evaluate in the canonical orientation.
Example command to evaluate on Objaverse
python evaluation/benchmark/eval_benchmark.py --benchmark Objaverse --data_root [data root] --objaverse_split unseen --checkpoint_path [your downloaded checkpoint path]
Example command to evaluate on ShapeNetPart
python evaluation/benchmark/eval_benchmark.py --data_root [data root] --benchmark ShapeNetPart --checkpoint_path [your downloaded checkpoint path]
Example command to evaluate on PartNetE test set
python evaluation/benchmark/eval_benchmark.py --benchmark PartNetE --data_root [data root --checkpoint_path [your downloaded checkpoint path]
Find3D can also be evaluated on object point clouds in the wild - 3D digital assets or 3D reconstructions from 2D. We provide a trained checkpoint [here](provide link). model/evaluation/demo/eval_visualize.py can take in any point cloud (as a .pcd file) and queries, and produce both a segmentation (using all queries) and a heatmap for each query. The segmentation and heatmaps will open in your browser as plotly visualizations that can be dragged and rotated. If you use ssh to connect to a headless server via Visual Studio Code, the plotly visualization will open in the browser of the client machine (e.g. your laptop browser).
Please run the commands below from the model directory, and set PYTHONPATH as the path of this repo.
cd model
export PYTHONPATH=[path to find3d]
Two modes are supported: segmentation or heatmap, controlled by the flag --mode. For segmentation, all queries will be used to segment the object. For heatmap, you will obtain a heatmap for each query - each opening in a new browser window.
Example command to perform segmentation on an in-the-wild point cloud in .pcd format
python evaluation/demo/eval_visualize.py --object_path evaluation/demo/mickey.py --checkpoint_path [your downloaded checkpoint path] --mode segmentation --queries "head" "ear" "arm" "leg" "body" "hand" "shoe"
Example command to obtain query heatmap on an in-the-wild point cloud in .pcd format
python evaluation/demo/eval_visualize.py --object_path evaluation/demo/mickey.py --checkpoint_path [your downloaded checkpoint path] --mode heatmap --queries "hand" "shoe"
Find3D's data loader works with data in the format provided by the data engine. Each training object should have a mask data directory and a point data directory.
The mask data directory should contain:
allmasks.pt(n_masks,500,500)mask_labels.txt(n_masks rows, each row a label)mask2pts.pt(shape (n_masks,n_pts), binary, indicating which masks correspond to which points)mask2view.pt(this is shape (n_masks,) each entry is a view id 0-9)
The point directory should contain:
normals.pt(n_points,3)points.pt(n_points,3)rgb.pt(n_points,3)point2face.pt(which point corresponds to which face)
Details can be found in the implemetation of the dataset classes in model/data/data.py.
With data generated by the data engine, Find3D can be trained from scratch using the following command:
python training/train.py --ckpt_dir=[checkpoint dir] --lr=0.0003 --eta_min=0.00005 --batch_size=64 --n_epoch=80 --exp_suffix=[experiment name]
Please use the following BibTeX entry if you find our work helpful!
@misc{ma20243d,
      title={Find Any Part in 3D},
      author={Ziqi Ma and Yisong Yue and Georgia Gkioxari},
      year={2024},
      eprint={2411.13550},
      archivePrefix={arXiv},
      primaryClass={cs.CV},
      url={https://arxiv.org/abs/2411.13550},
}